Here we are—the second installment of do-it-yourself products on my money-saving mission for the household… We got off to a small-scale but sparkly start the other day with DIY jewelry cleaner, which did an amazing job without the gagging sulfur-smells of commercial cleaners. And that actually raises a point I hadn’t addressed before. I’ve been focusing on the money-saving aspect, but the products we’re starting to make for ourselves are indisputably healthier to have around the house, and eminently more ecologically friendly than the chemical compounds we’ve been in the habit of buying before.
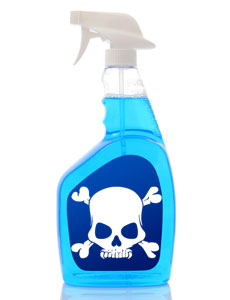
If we handled our household cleaners with the same care with which I was trained to treat chemicals in a microbiology lab, we’d have a thick notebook of MDSD (Material Data Safety Sheet) information, and the number of Poison Control programmed into our phones! “Harmful if swallowed,” “Irritant to Eyes,” “Corrosive,” “Flammable,” “Harmful Vapors,” “Possible Carcinogen”… This is the stuff we use to keep our home clean and healthy? Well that’s embarrassing.
In contrast, most of the DIY recipes I’m about to share are concoctions you could safely drink. Not that you’d want to, by any means, but from a health-and-safety standpoint (or from a Mommy-standpoint), that’s a striking difference!
By the same token, these toxic chemicals in cleaners (often even more hazardous when they combine with one another–which inevitably happens after we’ve washed them down the drains) are polluting our water and air and the ecosystems around us. The more I’ve researched this week, the more I’ve realized that my brain has been far more thoroughly “washed” than my bathtub all these years… In short, the “down sides” and disadvantages of DIY household-cleaners add up to a total of… ZERO.
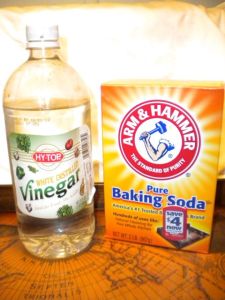
If you’re looking at a switch to economical and un-harmful household cleaners, your two largest-quantity investments will be vinegar and baking soda.
Vinegar is actually a mild acid with antibacterial properties, recommended medicinally by such notable folks as Hippocrates and the prophet Muhammed. (A fun historical-trivia side trip… It’s said that during the Black Plague in fourteenth-century Europe, a quartet of thieves made a good living robbing the homes of Plague victims while protecting themselves with vinegar and garlic. When they were finally caught, the judge is said to have offered to let them off the hook if they’d reveal the “secret” of how they’d stayed Plague-free…) From a scientific standpoint, a solution of 5% vinegar (diluted with water) has been proven effective 90% of the time in killing fungus, and 99.9% of the time in killing bacteria. It’s less effective than bleach at killing viruses, but it also doesn’t pose the dangers of acid-burn or inhalation-injury which are common household occurrences with bleach. And it’s cheap! (And attainable with food stamps.) Good stuff!
Baking soda, or sodium bicarbonate, also has a long-established history of medical and cleaning uses. (More history trivia… A couple decades ago Arm & Hammer donated enough baking soda to clean the Statue of Liberty! No word on how much that project took…) The powder itself can serve as an abrasive for scrubbing and is often used to absorb bad odors, and its chemical reaction with vinegar makes this combination rate as a super-power cleaner.
If you want to make your cleaners smell better, you can add a few drops of scented essential oils. I haven’t gone this route because I’m not spending any money I don’t have to (although I am growing lavender this summer and hoping to create some essential oils of my own–I’ll let you know how that goes). In the meantime, though, adding a citrus rind (lemon peel, for example) to a bottle of cleaner infuses it with a nice citrusy scent—and it’s cheap!
As you make your new household cleaners, you can store them in the spray-bottles that used to contain your old cleaners–just be sure to wash them out thoroughly to avoid any unintended chemical reactions. (Cooking oil usually works to get the gummy label-residue off your bottles, and then you can make your own labels, or even just write on them with sharpies…) Ready to get started?
Tub & Tile Bathroom Cleaner
The tub & tile recipe is the only one of the household-cleaners that calls for Castile soap, although this ingredient will also make an appearance when we get to personal-care products (next installment in the Kitchen Chemistry series!)… Castile soap can be found in both bar and liquid form, and it’s the liquid you’ll need for this.
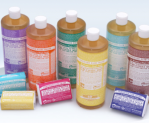
Dr. Bronner’s Castile Soap is the one I saw most frequently recommended as I researched, and with a sixty-year history, Fair Trade certification, organic and all-natural ingredients, and different flavors if you want to get “fancy,” I see why it’s a favorite. Its basic ingredients include hemp oil and tea tree oil, with other essential oils for the different scents. I went with the unscented, which is considerably cheaper than the “flavored” variations.
To make your tub & tile cleaner, just measure out the ingredients into a spray bottle to keep in your bathroom.
Tub Scrub
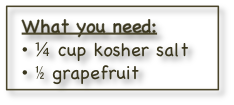 The salt in this recipe (kosher because of its coarseness–or you can substitute sea salt) acts as the abrasive element to give your tub a really good scrub. Cut a grapefruit in half, put the salt on its face, and use the grapefruit itself as your scrubber. The abrasive action of the salt gets the grime off, and you’ll end up with a great fresh, citrusy smell! (And the peel can go into another bottle of cleaner to add scent after you’re done with the tub.) This also works, of course, on sinks or toilet bowls or anywhere else that you get cruddy build-up which needs an extra scrubbing.
Toilet Bowl, Drain, & Shower-head Cleaners
 The vinegar-and-baking-soda combination works its magic in various venues in the bathroom–so although I found these listed as separate recipes, you can truly just keep the two ingredients on hand in your bathroom, ready to use in various ways.
- For use as drain cleaner, pour half a cup of baking soda into the clogged drain, followed by half a cup of vinegar. Cover the drain with a wet cloth for about five minutes, then flush with super-hot water.
-
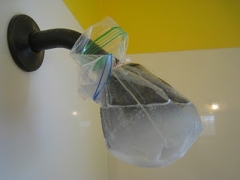
cleaning the shower-head: vinegar & baking soda in a Ziploc baggie To clean your toilet bowls, add a quarter cup of baking soda and a full cup of vinegar into the bowl, and let it sit for a quarter of an hour before scrubbing and flushing.
- To clean your shower-head, fill a heavy-duty ziploc baggie with a cup of vinegar and one-third cup of baking soda, then use a twist-tie to secure the baggy over the shower-head so it’s submerged in the mixture. Leave it overnight, and run some hot water through it when you take your morning shower.
Rather than having various bottles of different pre-mixed concentrations, we’ve found that the easiest thing is simply to have a “bathroom-dedicated” bottle of vinegar and a Gladware-container of baking soda—along with a couple old measuring cups—under the bathroom sink for easy access and quick use.
Glass Cleaner
 This one I keep pre-mixed in a spray bottle, and it works on metal fixtures (polishing the faucets) as well as on mirrors and windows.
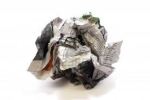 I follow up with the trick my mom taught me: the best thing for polishing glass isn’t a cloth (which tends to leave streaks or lint), but crumpled newspaper. It initially seems as though it will streak, but keep wiping until the glass-cleaner is no longer in evidence, and you’ll have a lint-free, streak-free, spiffy shined mirror!
Kitchen Cleaner
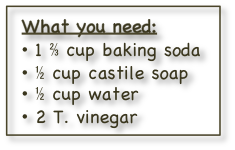
 Kitchen messes tend to include oils–so the kitchen cleaner includes the grease-cutting element of dish soap. (You can also substitute the Castile soap for dish soap if the liquid dish soap itself isn’t something you want to purchase separately.) Measure your soap, baking soda, and vinegar into a spray bottle, and then fill the bottle the rest of the way with water. Using warm water will help the ingredients dissolve, and you might need to give the bottle a shake or a swirl before using, just to make sure it’s still mixed before you spritz your kitchen surfaces.
Wood Polish
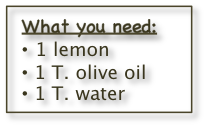 This is a recipe you’ll probably need to make fresh when you want to use it; you could keep the extra in the fridge for a while, but it won’t keep indefinitely.
 Squeeze the lemon (strain the juice, or at least pick out seeds) and then add the olive oil and warm water. Put a lid on the container and give it a good shake–the water and oil will naturally want to separate, so shake it up thoroughly right before using. A microfiber cloth with this mixture gives wood a beautiful polish, and it smells great! You could also use lemon juice straight from a bottle, rather than squeezing a lemon–although using a whole lemon gives you some lemon-peels to add to your other cleaner-bottles for scent…
Dishwasher Detergent
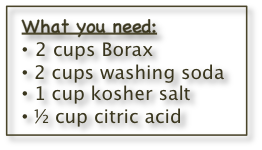 I’ve seen this recipe both with and without the citric acid, and with several different suggested sources of citric acid for those who choose to include it. If you have hard water, though, you’ll probably want to include the citric acid, which works to eliminate hard-water spotting on dishes and glassware.
 For the citric acid component, there’s a product called Lemi-Shine which gets rave reviews from users (I haven’t tried it, but it looks promising), or (the Food-Stamp kitchen-chemistry approach) you can use ten packages of unsweetened lemonade. Both the Borax and the washing soda (not to be confused with baking soda, though Arm & Hammer makes both) can be found in the laundry or cleaning aisle. You can use sea salt rather than kosher; as with the tub scrub, it’s the coarseness we’re after as a cleaning agent.
Laundry Detergent
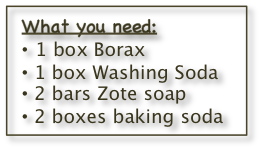 Truth be told, I thought I’d be out of luck on DIY laundry detergents, because we have one of those machines that requires the more expensive HE (“High Efficiency”) detergents. This is good for both our power bill and (if we weren’t on a well) the water bill, but problematic when it comes to keeping ourselves in detergent. The appliance salesman, back when I bought the machine, was adamant that the HE detergent was not to be messed with, but I’d never looked into what, precisely, is the difference between the detergents. When it came time to look into DIY options, that was my first question–and the answer (happily!) is that HE detergents are low-in-suds (a sudsy detergent will shut off the water pump in an HE machine)–and the DIY detergent fits the bill!
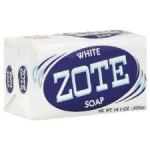 The majority of detergent recipes I found involved “cooking” big pots of soap to make a gel-like detergent that can be poured into the liquid soap-dispenser of the machine. The version I’ve chosen to use, however, is much simpler–no cooking!–and results in a solid detergent instead. So I’m adding the detergent directly into the machine with the clothes, rather than using the liquid dispenser feature of the washer, and I’m perfectly happy to do that and save the extra hassle!
The Zote soap (along with washing soda and Borax) can be found in the laundry aisle of Walmart or a supermarket, and it’s also available in a scented pink version.
If you have a food processor with a grater attachment, this recipe is super-easy. Without a food processor, you’ll be spending a little time to grate the soap…
A 5-gallon bucket is perfect for mixing (and storing) this recipe. We have a number of those around from the days when we used to buy soy sauce in 5-gallon installments for the restaurant. I’ve noticed that Home Depot also sells buckets this size, or perhaps you have one from a previous purchase of dish detergent or laundry detergent…
To create your detergent, grate the Zote soap, then add the Borax, washing soda, and baking soda, and make sure it’s thoroughly and evenly mixed up. A full load of laundry only needs two Tablespoons, which means this laundry detergent is going to last a long time!
Fabric Softener & Whitener
 This one is easy! White vinegar added to the “fabric softener” dispenser of your washer not only acts as a very effective fabric softener, but also whitens and brightens your clothes! You can use it in a color load (like “color-safe” bleach) and you don’t have the risk (as with bleach) of accidental spills and bleach-spotting, or acid-burns in clothing. A grapefruit peel added to your laundry-vinegar bottle adds a fresh scent, though I’m happy to report even the straight vinegar didn’t end up making our laundry smell like vinegar. I’ve also read that lemon juice acts as an effective brightening agent, and some people use a half-and-half mixture of vinegar and lemon juice. I haven’t yet tried this one (vinegar being cheaper), but I imagine the citrus-scent would be appealing (a-peel-ing?) as well.

To finish up your fabric-softening, you can substitute a couple crinkled balls of aluminum foil in your dryer in place of buying dryer sheets. The tin foil eliminates static, and can be re-used almost indefinitely.
Or, of course, you can save on your power bill by line-drying your laundry when the weather is dry and warm. (A clothesline is on my wish-list for this summer’s projects!) If you live in a climate like ours with strong summer sunshine (the Boise area is a “high desert” climate), you’ll want to turn any dark or colored clothes inside-out before hanging them, to avoid fading. For your whites, though, sunshine is an amazing “bleach!” My mother used to have an apron with deep pockets, in which she kept all her wooden clothespins, making it easy to pin up the laundry efficiently–so an apron like that will be my sewing-machine project when Keoni is installing a clothesline…
So there you have it!
Eco-friendly, people-friendly, and budget-friendly household cleaners… And although I embarked on this research project because of our tight financial situation, I’ll tell you right now that I won’t be going back to store-bought cleaners even when our finances improve. I love the simplicity of these, and it just feels good to do things this way. It’s a step in the direction of the lifestyle we want to be living–not because we’re crunchy hippie-types, but because health and environment matter, regardless of a person’s politics. Down the road, when our kids are finished with school in Idaho, we intend to open a bed and breakfast on our acre in Hawai’i–and one of our main goals there is to have the place be as self-sufficient and sustainable as possible! My dream is to have a grand total of two monthly bills–internet and insurance–and be providing our own power, water, food… Making our own cleaning products is just a little step in comparison to that goal–but a good step nonetheless.

I have at least two more installments upcoming in this series: DIY personal-care products (shampoo and the like), and “kitchen gardening” (we’re starting to grow some of our own herbs, and working on a composting set-up). I’m also hoping, as I said earlier, to branch out into some “luxuries” like making essential oils from our lavender–so there will definitely be some more Kitchen Chemistry upcoming! In the meantime, I hope you enjoy some of these recipes, and I’ll welcome the addition of your own tips and tricks if you have some to share!

These are great, thanks! Vinegar is so versatile. Wonderful to make your own. I make a lot with coconut oil, too–I mean for skin cleansing, not household cleansing–although I wouldn’t be surprised if it clean and polish anything, too.
LikeLike
Thanks so much for sharing these recipes, Kana. I will also be curious to hear how to make the lavender essential oils, as our lavender has begun to bloom. Great post!
Hugs,
Kathy
LikeLike
Great tips! I’ll have to try them out soon.
LikeLike
Wow! thanks for these tips – especially the drain cleaning one and the fabric softener and dryer sheet replacements … Have a kitchen drain that must have something in the line that emits the most awful odors when I run plain water. Have tried both ingredients separately but not together … the baking soda eliminates the odor for sure. With your background in science, I can trust your chemical combos without fear.
The aluminum foil is fabulous and using vinegar as softener will help keep the lime buildup in the washer to a minimum. We have really hard water here. We don’t even dare drink it – until its boiled three times and then with lemon slice on the third time.
BTW, for those who have tile, wood or marble floors: 1/2 cup of vinegar in hot water – no soap needed – makes the very best washing liquid ever! And, if someone in your house has athlete’s foot or ringworm, [same fungus for both], using vinegar to clean the tub or shower and on the skin and to wash socks and spray in shoes helps prevent the spread to others.
LikeLike
Thanks so much for this, Kana! We have a septic tank and I don’t want to put chemicals into the mix, or it’ll kill the good bacteria and quit working properly. I’ve been needing a good drain cleaner idea and you just gave me one! Yay!! I’m going to print this blog post and make some of these concoctions. You’re the greatest! :)
LikeLike
Another excellent point–we’re on septic as well, and I hadn’t even thought about that aspect! :)
LikeLike
Thanks so much for these suggestions. Vinegar is so versatile. Beth is right – those of us still on septic tanks really need to be using natural products because of the reason she stated and because it’s very difficult to determine whether any leakage is taking place from the drain field to the aquifer. You’ve got me inspired.
I’m printing it out too and reblogging. Thanks!
LikeLike
Reblogged this on P. C. Zick and commented:
I’m printing this one out and heading for the store. It’s good advice and easy and much cheaper. Plus it’s better for the environment – particularly those of us on septic tanks.
LikeLike
Having cleaned base housing I used vinegar and backing soda all the time. It’s effective and safe. The trick with the shower heads is especially helpful. It should be done at least once a week to prevent build up. Well done lady. Oh if you just started your lavender this year, wait a year to start using the plant. It will be bigger next year and the best all around fertilizer is coffee ground and egg shells in a zip lock bag. It smells horrible but if you do it once in the spring and then again in the fall by next year your plants will be huge. If you grow roses they will double in size. :)
LikeLike
Excellent tips–thank you! :)
LikeLike
Thanks, Kana. I keep hearing about all the challenges we as humans are creating for ourselves and I have a constant battle with my sweet hubs over cleaning supplies. I’m a vinegar and baking soda kind of cleaner. He is a buy lots and lots of stuff in spray bottles or cans that make me choke and don’t do a better job.
I appreciate the recipes, and all in one place. We are going natural!! :D
LikeLike
*Cheering!* :)
LikeLike
These are wonderful! I can’t wait to try them! I use vinegar and water to mop floors, pour bleach down the tub to clear clogs and use baking soda to clean water bottles. Thank you for sharing your tips!
LikeLike
This is great Kana! Thanks for putting this all together for us. Judy
LikeLike
Drain Cleaner works GREAT! Just be sure to cover the drain as directed right away as it burbles immediately. Thanks Kana
LikeLike
1) I had heard that if you mix vinegar and baking soda in a spray bottle, the chemical reaction takes care of any cleaning power and just leaves you with salty water. I would appreciate your science boffin take on this.
2) I had a repair man for my LG HE washer in, and he told me to only use enough liquid detergent to cover the writing on the bottom of the measuring cap. This was probably 1/8th the amount I was using. Even with all the kids, my laundry is just as clean as it ever was, when I was pouring my money down the drain. Like you said, I guess my brain was being washed along with all those clothes!!
LikeLike
In answer to #1–yes and no… You’d still have the antibacterial and cleaning properties of the vinegar, and possibly some of the properties of the baking soda, so it would still be more useful than saltwater as a cleaner… ;) BUT… There IS a chemical reaction when you first combine the two, and that fizzing reaction can actually add “oomph” to the cleaning-ability of the mixture. So yes, bottom line–combining them at the moment when you intend to use it is more productive than having them pre-mixed. :)
LikeLike
Thanks! I’ve been trying to find that answer for that for years!
LikeLike
We are flashmobbing Hotspur today. I thought you might be interested in helping. For more details: http://wp.me/p2pR2U-1n3
LikeLike
I’m in! :)
LikeLike
Thanks! It is fun.
LikeLike
on the laundry soap, what size box of baking soda are you using? I’ve seen the regular size and then a much larger size box. I’m guessing it’s the larger size box? I’ve been a fan of homemade recipes for a long time myself!
LikeLike
Oh my, Kana, you HAVE been busy! Thanks for sharing. I’ll have to get to it.
LikeLike
Simple, inexpensive, and practical — all while helping our world in its effort to regain its health. 8-)
LikeLike
Wow, Kana, thank you for these posts! So incredibly useful.
LikeLike
Reblogged this on this curious universe and commented:
I had to reblog this. As a person who admittedly has always used the pre-bottled cleansers, I found this DIY post incredibly interesting. I am all about saving money and–of course–the earth! Take the time to read this valuable post on making your own cleansers out of natural materials. You will be very happy you did!
LikeLike
We found for hard water deposits, citric acid does a better job than vinegar and is a lot less smelly ; ) We use it to clean out my husbands hot water pot as well as clean the hard water deposits in our toilets, tub, and shower with great success. It even gets the deposits in the curve of the toilet drain that i have trouble getting too. You can buy it online in bulk for pretty cheap.
When we got our HE maytag front load washer about 10 years ago we were told to use at least half the suggested amount of soap. It does a great job even with that. There’s less water so you don’t need as much soap.
We also had similar suggestions as some of you got from the gentleman that repaired the washer recently. He said never ever use liquid detergent, it damages the rubber seal. He suggested with the hard water we have to use vinegar to soften the water and clothes. He also suggested adding Borax as well. Apparently It improves the cleaning and helps remove hard water deposits from the internal bits of the machinery. He also said borax can be run through the dishwasher as well to help clean it out good for a cycle and that vinegar is cheaper and just as good as the rinse aids.
LikeLike
My thanks to EVERYONE who added information and suggestions! I love this community. :)
LikeLike
Hi, this is a great blog! We have to keep the Earth safe and that takes effort! I really love it when someone thinks about the big picture before themselves! Thank you for the like and follow! I hope your writing inspires change, keep writing!
LikeLike
Glad you enjoyed–and glad I found YOUR blog. :)
LikeLike
And–no kids reading this, right?–to clean off a shower curtain, spritz an air freshener, and get the stickers/price tags off bottles–use vodka. No kidding. Vodka and water spray for the shower curtain and air freshener, but straight for removing the tags. It really works. And if you’re tired and discouraged from a rough time cleaning and the kids are down for naps or visiting Grandma, well…
LikeLike
I’m giggling–makes me think of a refrigerator-magnet I used to have, which said “I like to cook with wine. Sometimes I even put it in the food.” Unfortunately, that was a little TOO true in my case–and since hubby & I are both recovering alcoholics, we don’t have vodka around the house any more… Having said that, though, I came across the vodka-advice (both parts, LOL) frequently as I was researching–clearly it’s effective! And for those who can safely apply it internally as well, go for it! ;)
LikeLike
Wow, those are amazing! I suppose I should have known there were natural substitutes for everything but its still amazing to read it.
I would feel much better about those things being in the kitchen cupboards with young children around. There are far too many stories of children accidentally swallowing bleach and other silly things.
And all so easy to get hold of.
I can see me making some changes to this household in the coming weeks. :-)
Looking spears to your next instalment, Kana!
LikeLike
Yes, the kid-safety factor definitely ranks among the top reasons to make some changes, even if we weren’t so strapped financially! :)
LikeLike
Funny how it isn’t more common knowledge that these things work. Its not like there’s a shortage of households with young kids in them.
Bonkers really.
And as you say, its really telling that generally we choose chemical laden fluids and potions over something natural that won’t kill you if you drink it by accident!
LikeLike
Hi, Kana,
Could you give volumne references on the laundry soap recipe? What size boxes should I be using and what size bars of soap?
Thanks!
LikeLike
My bad–I should have been more specific! I used a 76-oz box of Borax, two 2-pound boxes of baking soda, 2 bars of Zote soap (we used the white, but the pink is nicely scented if you prefer that), and a 3-pound box of washing soda. Hope that helps! :)
LikeLike