
Well, here we are with the third installment of Kitchen-Chemistry do-it-yourself cleaners—doing positive things for both our wallet and our well-being! If you’re just joining, the previous installment covered household cleaners made from kitchen ingredients… They’re doing a great job of cleaning the house, they cost next-to-nothing to make, and we know they’re better for the environment (an immediate concern in our case, given that we’re living on a river-island with a very high water-table and using well-water)…
Since then I’ve been experimenting with people-cleaners, so here are my favorite recipes, tried and tested by my personal guinea-pigs family…
First, A Few Words About Castile Soap
The most expensive ingredient in the shampoo recipe is liquid Castile soap, made mostly from olive oil, and named for the region of Spain where it originated. I spent a fair bit of research-time trying to find a way around this expense (about 25 cents per ounce if you buy by the gallon, as much as 50 cents per ounce in smaller bottles), and concluded that I’m not equipped for home soap-making. It’s a more hazardous brand of kitchen chemistry, due to the use of lye, and requires some precision instruments (scale and thermometers) which we don’t have on hand. For body wash, you can find recipes that bypass the use of lye by grating existing bars of soap and adding your own ingredients, but bar-soap on hair doesn’t work well (I’ve tried)–so for shampoo I’ve included both the full-on”Food-Stamp Kitchen-Chemistry” suggestion, and the one I liked better, with the use of Castile soap when I can afford it. OK, on to the good stuff…
DIY Shampoo
Shampoo was a tricky one because, although I’m none too picky about things like body-soap, I’m very fussy about how my hair feels.
One of the most frequently recommended shampoo substitutes is a simple mix of baking soda and water, preferably followed by a rinse of apple cider vinegar. It works, and it’s absolutely the cheapest approach, although it’s not my favorite find. The cider vinegar leaves hair soft and shiny (and surprisingly, not smelling awful after rinsing), but it is a bit strong during application in the shower. (On the up-side… When you’re dousing your head with the equivalent of half a cup of “smelling-salts,” you’ll be plenty alert by the time you step out of your morning shower!) The lack of lather felt odd when I was “shampooing” with the baking soda, but it got the job done.

I should note that the baking soda approach is the favorite of our 11-year-old son, Christian (who doesn’t care about “conditioning” and skips the vinegar step)—I had promised him that if I came up with a suitably biodegradable shampoo-substitute, he could take his “bath” in the lake. Promise kept—and I definitely scored Cool-Mom Points with this one! His only challenge is in rinsing all the baking-soda out, given his curly crop of hair with its approximate consistency (and tenacity) of velcro… For the rest of us, however, the Castile-soap recipe is the winner…
Big excitement: I got to use our home-grown herbs for this recipe!
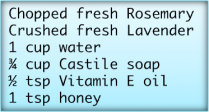 I steeped the rosemary and lavender in the water, strained out the herbs, then added the Castile soap, oil, and honey. The whole batch went into an empty bottle of bought shampoo (Reduce, RE-USE, Recycle).
I found the Vitamin E oil at Walmart ($4 for 2 ounces, which will last for quite a few batches). I also saw recipes recommending coconut oil, grapeseed oil, and other light vegetable oils, but (thanks to that “Vitamins” e-book I wrote), I know Vitamin E is good for hair growth. The honey is intended to add shine, and the rosemary & lavender are supposed to be good for growth, as well as fragrance. One usage-note: give the bottle a good shake before using, because the oil tends to separate out.
 Our 16-year-old son, Kapena, needs dandruff shampoo, so I made a separate bottle for him, adding a couple bags of nettle-leaf tea to the steeping step. (For some reason, no one was in favor of adding stinging nettles to our garden. Hmm.)
DIY Conditioner
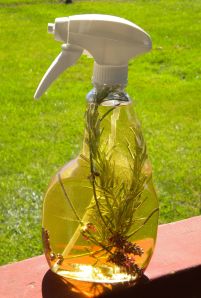
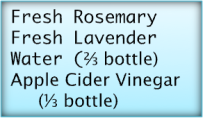 Once again, the most frequently recommended conditioning rinse that turned up with my research was vinegar. And I found one version that takes some of the wallop out of the vinegar-in-the-shower smell. I filled a spray bottle one-third with apple cider vinegar and the other two-thirds with water. A couple sprigs of rosemary and a few stalks of lavender in the bottle add some pleasant fragrance. I just use the spray-bottle in the shower after I shampoo, leave it in while I soap up, and rinse it out before shutting off the water. Some users actually recommended leaving it in rather than rinsing out, but I really don’t want to go around smelling like a fish-and-chips shop…
I’ll add that it did feel strange at first because I’m used to the creamy/slippery feel of conditioners, and I feared that this rinse wouldn’t be any help as a de-tangler. My hair gets way more snarled than you would expect, given how straight it is… But to my surprise, it combs out easily! There’s a faint whiff of vinegar while it’s still wet (Christian says it smells like sunscreen when I’m just out of the shower, hmm), but that scent doesn’t seem to linger.
Then there’s my very favorite conditioning, which I’m doing about once a week: Mayonnaise! I can’t believe what a gorgeous difference this makes—my hair tends to get dry and frizzy, but after my mayo-treatment it’s soft and shiny … Honestly, t’s like somebody else’s hair! I’ve never used a conditioner or hot-oil treatment, no matter how expensive, that worked as much magic as mayonnaise.
It looks pretty goofy (sorry, you won’t get a photo of this process) but I rub the mayo into my hair before I get in the shower, leave my greased-up hair wound on my head like a turban for ten minutes or so, and then hit the shower. Washing the mayonnaise out works best if you add your shampoo before getting your hair wet. Then just shampoo & condition as usual. One note on this one: it doesn’t make any difference to the results, but it’s a lot more comfortable to use room-temperature mayo rather than straight-from-the-fridge cold.
DIY Body Wash

I was initially going to skip the idea of body wash, because I didn’t think I could get any cheaper than just buying a bar of soap. In fact, most of the recipes involve a bar of soap being grated into them anyway. However, Miss Elena Grace raised the protest that she doesn’t like using bar-soap, and on further reflection, the diluting ingredients added to the grated soap might actually make it stretch farther. I haven’t managed a statistical comparison of how long a bar of soap lasts us compared to a bar-of-soap’s-worth of body wash, but at half a gallon of body wash per bar of soap, I think we’re coming out ahead—and Her Highness is satisfied.
 There’s a multitude of recipes to choose from, including those made with Castile soap and those made from existing bar soaps. In this case I went for bar soap because it makes a larger volume at lower expense. There are also all kinds of suggested additives, so you can get pretty creative with whatever you’d like. Add herbs, add essential oils, add a couple tablespoons of honey or coconut oil…
Some recipes include glycerin and some left it out—a little research revealed that glycerin makes soaps translucent, but doesn’t necessarily add to the “cleaning power”… It does act as a moisturizer, however, so if you have really dry skin you might want to include it. If you want to add glycerin (the body wash would no doubt be prettier), it’s pretty cheap and can be found by the Bandaids.
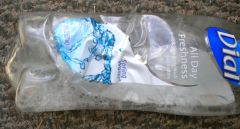
The recipe is simple: Start a half-gallon of water boiling in a large pot, and then put your bar of soap in a microwave-safe container and zap it for about 90 seconds. (After dozens of sites with instructions to grate the soap, I found one that recommended the microwave. By golly, it works! And takes most of the hassle out of this recipe…) Do watch it while it melts to make sure it doesn’t bubble over and make a mess in your micro. Pour the softened soap into your boiling water, add any ingredients you choose (I included a couple tablespoons of Vitamin E oil—great for skin as well as hair—because I do have dry skin, and hadn’t bought glycerin). When it’s thoroughly mixed up and the soap thoroughly melted, pour it into containers (we’re just re-using containers from previously-purchased body wash bottles) and let it cool. (One lesson learned: if you’re pouring into flimsier plastic, let it cool a little before pouring. I have one crumpled-melted Dial bottle to offer as evidence…) It looks pretty watery for a while, but it thickens up nicely a few hours after the initial cooling.
Because you’re using manufactured soap for this, you don’t have to worry about preservatives or spoilage. Having said that, if you do pick up a recipe with Castile soap, I’ll pass along a tip which didn’t accompany all the Castile-recipes I saw, but probably should: add a teaspoon or so of citric acid to prevent bacteria from growing in your mixture. (For the Food-Stamp kitchen-chemistry version, you can use a packet of unsweetened powdered lemonade.) If you make bigger batches of shampoo than the recipe I gave above, you might consider doing the same with the shampoo.
And I’ll add that an advantage to this body wash approach is that you can use a favorite brand of soap. Kapena likes Axe products (drenches himself in them, to be honest), so a bar of Axe soap-turned-bodywash made him very happy. We’ve always liked Irish spring, so we’ve got the green body wash in our shower. And when the kids tried out their new pocket knives by carving up bars of Dial soap (my favorite “sculpture:” Christian carved a cell phone that cleverly had the “Dial” logo on its back) I gathered up their shavings and leavings and added that to a batch as well.
DIY Body Scrub

Ah, the luxuries in life! I’ve always enjoyed a good exfoliating body scrub, and it turns out they’re easy to make. Most scrubs use sugar or salt for the exfoliating agent, but I’ll add the warning that you shouldn’t use salt if you have dry skin. (I could give the whole chemistry-teacher lecture about osmosis… Or we could keep it simple and I’ll just say that salt sucks the water out of your skin cells and leaves your skin dryer.)
 There are so many delicious recipes, I couldn’t narrow down the field to just one! At its most basic, the body scrub recipe boils down to one part oil to two parts sugar. As for what type of oil, you can go with baby oil, vegetable oil, coconut oil, almond oil… Whatever tickles your fancy (or whatever you already have in your kitchen).
Possible additives for fragrance include vanilla extract or pumpkin spice (which is just allspice & cinnamon & nutmeg) or lemon zest (grated lemon peel) or even coffee grounds (love that one!)… Pretty much whatever comes to mind.
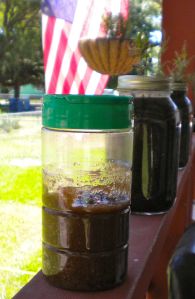
I found the easiest way to mix is to add a little of the oil to the dry ingredients—just enough to make it “crumbly”—and mix it all thoroughly. Then put it into whatever container you plan to use, and add the rest of the oil. My current scrub is in a Parmesan Cheese bottle (so fancy!) because that’s what was empty at the time. Note for next time, though–a shallower container would be more convenient. Now that I’m into the bottom half of this one, I’m keeping a spoon in the shower to scoop it out…
In a nicer container, this would make a great gift. I’m remembering spending something like fifteen dollars for exactly the same sugar scrub I just made with about twenty-five cents’ worth of ingredients. (Ouch!)
One more note: the days I use the sugar scrub, that’s a good time to have the DIY tub-scrub ready—the body scrub tends to leave an oily film on the bottom of the shower. But wow, does it do a great job on me. The first time I made it, I used it one one leg and not the other (no moisturizer afterward) and I could see the difference. You know that scaly-white alligatory look of dry skin? That was the un-done leg, and the other one… Silky smooth.
DIY Eye Makeup Remover
 I’m not picky about using body-soap on my face, but when it comes to removing eye makeup, soap just doesn’t do it. If you plan ahead and buy the “mild” Castile soap, it’s sometimes the same price as regular, and is fairly easy on the eyes. Alternatively, Johnson’s baby soap (“no tears”!) works great.
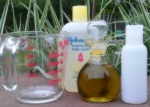 Just mix a teaspoon and a half of the baby shampoo or mild Castile soap with a cup of water and a quarter teaspoon of olive oil. Give it a shake before each use, and apply with a cotton swab or re-usable cloth. I’ve always liked the Almay eye-makeup remover pads, but at five bucks for 80 pads, that’s out of my price range these days… And this little mix does just as well!
DIY Deodorant
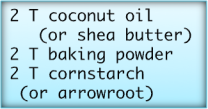 This one you can’t do without. (At least in America. Though I’ve visited some countries where eau d’underarm was the accepted norm…) And this one took a fair bit of fiddling before I settled on something that was usable. This version is a little more liquid than some variations, but that helps in applying it thinly. Too thick, I found, and it dries in powdery clumps that drop off afterward. I recommend applying after a shower (when your under-arms are dry) and before dressing–if you dribble on clothing you might as well pick a new outfit for the day. I’ll also add that this goes on white, so it’s not the deodorant you want to wear with that sleeveless little black dress.
 The recipe I settled on (though you, too, can fiddle with amounts—more or less oil to make it less or more solid) is equal amounts of coconut oil, baking powder, and cornstarch. For people who don’t react well to cornstarch, arrowroot is a suggested substitute—more expensive, but available in the spice aisle. The cornstarch (or arrowroot) acts as an antiperspirant, and the baking soda absorbs odors. Another ingredient suggested in place of coconut oil is shea butter—but I had coconut oil already in the kitchen. Lots of people also add essential oils for fragrance, but I’m not a fan of flavored armpits.
I wasn’t sure how DIY instructions would handle application–I found one recipe that suggested packing your DIY mixture into an empty deodorant-stick, but most recipes just suggest a jar. (I actually don’t think the stick-idea would work well—even the most solid variations weren’t dense enough to keep their shape, especially when the bathroom was warm…) Scoop some and apply with fingers, or (for less mess) with a spoon or a little wooden paddle like the ones they use for tasting at Baskin Robbins. One user suggested rubbing it into your hands like moisturizer after applying, but I find it too gritty for that. I’ve been keeping a broken-off plastic spoon in my little container, and spread the deodorant with the back of the spoon. It’s worth mentioning also that the consistency changes drastically with temperature. It might be quite solid on a cool morning, and completely liquid on a hot afternoon.
This particular recipe is not a hit with the members of the household who have under-arm hair (especially Kapena, who is wedded to his Axe deodorant) so although I’m doggedly using the batch I made (and re-mixed, and re-re-mixed), I suspect that deodorant is one of the few items we’ll continue to buy. It works, I’ll say that much for it. But I don’t love it.
 And after all that… An alternative that’s less messy and fairly effective: just the baking powder and cornstarch, patted on like baby powder. However, it doesn’t really “hold up” for all-day use, especially on a high-desert Idaho summer day.
I’ll share one more idea that might work for you, though it’s not for us to try. (We’re both recovering alcoholics and don’t keep any kind of alcohol in the house.) A spray-bottle of rubbing alcohol, spritzed under the arms, is said to be effective in killing odor-causing bacteria. People who use it swear by it, and it’s certainly easier (and cleaner!) than my own attempts.
DIY Toothpaste
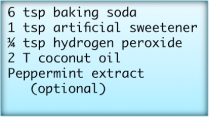 I’ve made two separate batches of the toothpaste—one without the whitening agent of hydrogen peroxide (for the kids) and one with (for us coffee-drinkers and recent smokers). Mix six teaspoons of baking soda with a teaspoon of sweetener (Splenda or Equal or whatever you use in your coffee, as long as it’s not sugar) and two tablespoons of coconut oil.
Peppermint is a traditional toothpaste-taste, of course, but really you could use any flavor. You’ll want to use something, though, because the baking soda is super-salty, and it’s like brushing your teeth with seawater if you don’t flavor it. (Believe me, I tried.)
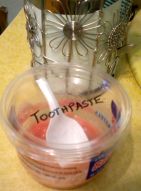
I mixed the toothpaste batches in containers for cupcake-papers, and put a cut-off plastic spoon in each for easy application onto toothbrushes. Just for fun, I let the kids pick food-coloring, so here’s Elena Grace’s pink toothpaste!
Reflection

It says a little something that we can’t use bought shampoo in the lake… But we’d use it on our kids. Hmm. Now that I’m thinking about it, that’s probably a good standard to follow: if we could rinse it off in the lake, it’s safe on our kids. And us too, come to that. Now I can actually list (and pronounce!) the ingredients of everything being used to clean My People.
Check the ingredients on your store-bought shampoo against any list of harmful-chemicals-to-avoid, and you’ve got a better reason than “being broke” to make some changes. Besides… If you’re at all like me, you might get a kick out of making your own. Here’s to healthy living!
Many thanks to my dear Husband, who has patiently put up with (and mopped up after) the various messes I made in his kitchen, and with equal patience has been dabbing experimental goops on various parts of himself at my request. Mahalo nui loa, Keoni ku’u pilikia!

Bloody wonderful!!!
LikeLike
Great tips, except of the mayonnaise, but I think that’s personal :)
I remember my mother using beer for our hair after shampooing. Makes it soft and shiny and it’s full of vitamine B.
LikeLike
I read the beer tip as well in my research! It’s another recipe these receiving-alcoholics won’t be trying, but it gets rave reviews! ;)
LikeLike
Marvelous! I am going to have to try the vinegar conditioner this morning. :-)
LikeLike
Impressive, Kana–and, in a simple way, life-affirming.
LikeLike
I always wondered why it was called ‘Castile’ soap, thanks! Will definitely try the shampoo & conditoner, I love using apple cider vinegar and drink it regularly (just a thimble-full!). Cath
LikeLike
Great info–thanks Kana! I believe our bathrooms should look like our kitchens. :)-Julie
LikeLike
Wonderfully put! We’re definitely moving in that direction. :)
LikeLike
U’a Hiki No! Although I should point out that “pilikua” means beloved husband whereas “pilikia” as you wrote, means trouble maker. Hmm, I wonder what the Hawai’ian words are for Freudian Slip?
LikeLike
What, you think that was UNintentional? ;)
LikeLike
Only one question: When are you going to give us our own homespun make-up? I really want to use something safe near my eyes … now that I treasure them so much. Both eyes are fully healed and my vision is 20/20 in both eyes to the amazement of my surgeon and his optometrist!
LikeLike
Excellent plan—I hadn’t even thought about makeup yet… I’ll see what I can dig up. :) I’m SO happy for your amazing vision, and your return to being able to “feed your brain!” :)
LikeLike
Hello, again! It’s been awhile. Awesome DIY post, by the way. I did one about a week ago as well. I stopped by to invite you to my new-website-theme-housewarming-thingy, because you were on my list of WordPress.com followers. I deleted my old WordPress.com site and, after the last few months of changing it up, I’m finally proud of RNMcKinnon.com (especially its new theme, launched yesterday!). Hope you’ll stop by. Keep writing!
LikeLike
Love these do-it-yourself recipes!
LikeLike
Wow, Kana, I am so very much reminded of being back home on that Mississippi farm and using baking soda and vinegar and homemade mayonnaise on our various heads of hair, depending on the season and the individual needs! Mayonnaise is a super conditioner for dry hair! I am so encouraged about your ventures into organic and environmentally friendly personal hygiene products. I am finding more and more that economically-induced searches for simpler household products almost always benefit the environment!
LikeLike
I’m arriving at that very same realization! :)
LikeLike
you are the DIY queen! :D
LikeLike
I shall make myself a crown! ;)
LikeLike
:p but after the anklet please? :p haha
LikeLike
You got it! ;)
LikeLike
Love that you have a recipe for eye makeup remover. I have such sensitive eyes, and most products sting terribly, or they are too oily that they may not sting but they leave a residue on my skin which ultimately gets into my eyes and then I have blurry, greasy vision, lol. I will have to try your recipe, thanks.
LikeLike
Let me know how it works for you–I’d be pleased to find out that this works for the super-sensitive… (And if it doesn’t—well, that’s good to know too.) :)
LikeLike
I liked the part about the stinging nettles for dandruff. I have a large bag full I bought for allergies and now I know what to do with them to help my sons bad dandruff. Thanks!
LikeLike